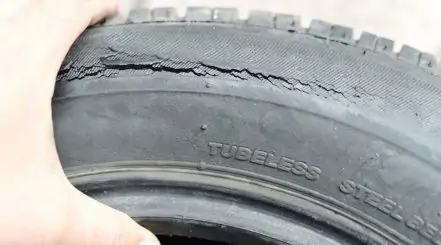
Perhaps your clear coat has faded severely with time and needs to be refreshed. Or, it’s suffering from delamination: unsightly peeling or flaking.
Either way, it’s going to have come off. There aren’t any miracle products that can conceal the deterioration once it’s past a certain point.
This can be a delicate procedure, requiring specialized tools and equipment. If you damage the underlying paint, you’ll end up with a whole new issue on your hands.
In this article, you’ll learn how to remove clear coat the right way.
Below, we detail, step by step how to remove the clear coat from your vehicle, including what supplies you need and how to use them.
We also advise you on certain techniques that should be avoided. If you don’t want to attempt the DIY method, we also discuss what going to a professional will entail.
A Warning: Don’t Use Thinners or Solvents to Remove Clear Coat
Aside from all the preparation, the actual removal requires precision and focus.
If you’re too heavy-handed while sanding or buffing, you can burn through healthy paint. Plus, you’ll have to set aside a good chunk of time. Rushed aesthetic modifications will rarely look as good as those with a slow, steady approach.
For these reasons, some people tend to sway towards using lacquer thinners or other solvents. After all, solvents are used for dissolving, loosening or diluting other substances.
However, we don’t suggest you use them. You won’t have any control over what the solvent does once it’s on your vehicle.
If you rinse it off too soon, it won’t have been effective. Wait too long, and the chemical can eat through your paint. A powerful enough compound will burn right through to the bare metal.
Thee’s just not enough margin for error, and use of thinners or solvents will result in damaged paint a high percentage of the time. So avoid at all costs.
Equipment Needed to Remove Clear Coat
Note that these supplies are exclusively used for removal. If you want guidance as to how to complete the repair, we have an article here: Clear coat repair.
This is a list of everything you’ll need:
- Safety gear.
- Motorized polisher or buffer; polishing and buffing pads.
- 1,000 to 1,200-grit sandpaper or scratch pad.
- Car wash supplies.
- Light-grade clay bar and lubricant.
Safety Gear
There will be dust and grime in the air as you begin sanding. Your mouth, eyes, and nose must be protected. Inhaling fine dust particles can be harmful to your lungs and irritate your eyes.
You’ll need:
- Safety goggles.
- Mask.
- Gloves
- Overalls.
Motorized Polisher or Buffer; Polishing and Buffing Pads
If you haven’t had much experience using these tools, err on the side of caution by choosing buffing and polishing pads that aren’t too abrasive.
Sandpaper or Scratch Pad (1,000 To 1,200 Grit)
The grit of sandpaper and scratch pads is what determines the cut. The higher the grit number, the less aggressive the cut.
This will translate to more time spent sanding. However, it will also lessen the chances of you inadvertently taking off more than the layer you’re targeting.
Washing Supplies
Have the following supplies to hand:
- Bucket.
- Car wash mitt or car-safe sponge.
- Microfiber cleaning towels.
- Car shampoo. (Choose one from our guide to the best car wash soaps if you don’t have one already.)
- Access to a water source.
Light-Grade Clay Bar And Lubricant
Buy a lighter grade bar for this purpose. Your exterior is already in a fragile state with a fading or peeling coat. You don’t want to leave micro-scratches on the exposed paint.
How to Remove Clear Coat
Removal is just as, if not more, important than applying a fresh coat. Polyurethane coatings are less likely to stick to a poorly prepared surface.
All traces of the old, damaged coating must be completely removed. The ideal bonding surface is smooth, even, and unmarred.
Here’s your simple to follow, step by step process:
- Pick a suitable work area.
- Wash the area to be treated.
- Rinse and dry it off.
- Clay bar the area.
- Wash, rinse, and dry it again.
- Prepare your sandpaper or scratchpad.
- Put your safety gear on.
- Wet-sand the area, blending if needed.
- Wipe the sanded surface clean.
Step 1: Pick a Suitable Work Area
Choose somewhere well-ventilated with good lighting to work in. You have to be able to see what you’re doing clearly, as well as avoid breathing in unhealthy dust.
Step 2: Wash the Area to Be Treated
Mix your car shampoo with water in your bucket. Using your mitt or sponge, wash the area you’re going to remove the coat from.
If the coat is badly flaking, don’t be surprised if pieces come off. Still, you shouldn’t pull or peel any with your fingers. You’ll be taking it off soon enough.
Step 3: Rinse and Dry it Off
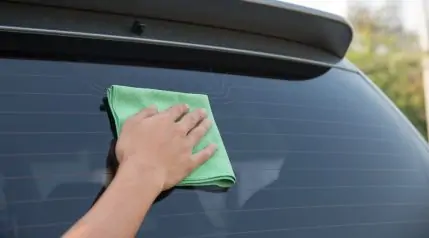
Thoroughly rinse the section you washed and then dry it off with your microfiber cloths.
Step 4: Clay Bar the Area
Squeeze and shape the bar until it’s softened. As you’re using a lighter grade bar, this should happen quickly. You can wear your gloves if you don’t want to touch the bar with your bare skin.
Spray the freshly washed section with your clay bar lubricant. Feel free to spray the clay itself once or twice.
Sweep the bar over the surface in smooth motions from side to side.
When the clay becomes too dirty, remold it and repeat. There should be no residual contaminants by the time you’re done. The bar should come back clean.
You can click here for a deeper dive into how to use a clay bar.
Step 5: Wash, Rinse and Dry Again
Prepare a fresh bucket of water and car shampoo. Wash the remaining lubricant off the surface and rinse it until it’s clean. Dry the area thoroughly using microfiber cloths.
Step 6: Prepare Sandpaper or Scratch Pad
If you bought a large sheet, cut your sandpaper into manageable strips. Fill your bucket up with water and add a dash of car shampoo, mixing it up.
Put your scratchpad or sandpaper strips into the bucket, ensuring they’re submerged. Leave them there for 5–10 minutes.
Step 7: Put Safety Gear On
While your sandpaper or scratchpad soak, get your safety gear on. Adjust your mask and goggles so they’re secure.
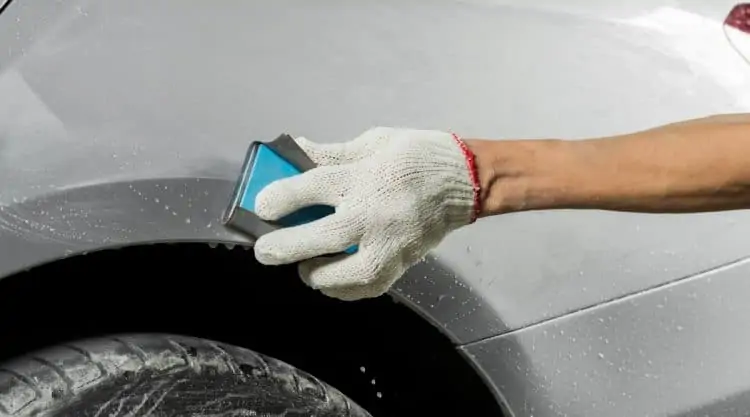
Step 8: Wet-Sand The Section
Take the sandpaper or pad out of your bucket. Applying firm pressure, rub the sandpaper or scratchpad over the section you’re working on.
Avoid using random motions as this will lead to uneven sanding. Move the paper or pad in small, circular motions or side to side, covering the whole area.
Don’t forget to press the entirety of the paper against the vehicle with your fingers. If this is difficult for you, wrap the paper around a small pad or sponge.
Make sure the pad or paper stays wet. Get a new strip or re-soak the pad when it starts to dry out.
Wipe the grit and grime off periodically with a damp sponge to see how you’re doing. Once it looks dull and smooth, your work is complete.
Blend Into Surrounding Areas if Needed
If you’re doing a large section (e.g., the hood), you don’t have to blend.
For smaller sections, blend into the surrounding area. Otherwise, there will be an obvious contrast between the new coat you apply and the old.
Step 9: Wipe the Sanded Surface Clean
Using the soft side of a damp sponge, wipe the area repeatedly until it’s clean, applying gentle pressure. Rinse and wring the sponge out after every pass.
The area is now ready for further detailing. You can either apply your clear coat spray directly or buff and polish it if you want to wait a while.
It’s advisable to apply some sort of product to the sanded surface to protect it. You’ll want to shield that exposed paint from the elements.
Going to a Professional to Remove Clear Coat: What to Expect
Remember you can always get a quote from a professional. It may be preferable to shell out cash if you’re dreading doing clear coat removal on your own.
Check around at different detailing shops to get quotes. The size of the area needing treatment and the individual business you approach will both greatly impact the cost.
Some professionals may refuse to perform clear coat removal alone. You may be obliged to pay for a fresh coating.
Conclusion
Learning how to remove clear coat is a skill that can serve you for years to come. The older your vehicle gets, the more likely it is that this layer will wear down.
This expertise can also be beneficial for you in terms of finances. Leaving removal and repair to a professional can be an expensive privilege.
Rather than letting nature take its course, you can intervene. Sanding the deteriorating section down is better than letting it flake away over weeks or months.
Do you have any questions, comments or experiences? Please share them below. We look forward to hearing from you!