Running your car through the local car wash is a breeze. Hand-washing a car on a lovely summer day can be a joy. But what about the interior of your car? Does it match your freshly-washed exterior? Or does it need a little attention and TLC?
Most of us face stains, old food that calls in an army of ants, spills, mud, dog hair, or plain old grime due to wear and tear at some point in the life of our cars. So, what’s the best way to get your car looking and smelling fresh again with the least amount of pain?
In this short guide on how to clean car upholstery, we’ll describe a simple approach for cleaning up ordinary levels of dirt that accumulate on car upholstery due to regular use in the course of our busy lives.
Soiled upholstery or special situations like mold or mildew may need the help of a professional detailer, but a routine clean-up is manageable by anyone.
Some of these methods can also be used to spot-clean your car’s carpets as well. Since carpets tend to have a lot more embedded dirt and grit, deep cleaning them may require a professional-level carpet cleaner, one with hot water and powerful suction, so this how-to focuses on just your car’s upholstery.
Key Takeaways
- Big Rewards – It takes minimal effort to clean car seats and the rewards are various, including a higher resale value and a more pleasant smell inside your vehicle.
- Leather or Fabric? – The cleaning process differs for each material type and you’ll need to make sure you buy the right cleaning product!
- Do It On the RIght Day – A dry, sunny day with a light breeze is ideal.
Contents (Jump to Topic)
- 1 Key Takeaways
- 2 Getting Started With Your Car Upholstery Rehab
- 3 How To Clean Car Upholstery – Step by Step! Let’s Get to Work on Your Seats!
- 4 Does It Matter If I Have Grubby Car Seats? Why Should I Bother Cleaning Them?
- 5 My Seats Are Clean, How Can I Keep Them That Way?
- 6 Cleaning Up Your Car’s Seats: Job Done!
Getting Started With Your Car Upholstery Rehab
Pick a Good Time
Check the weather forecast and pick a warm, pleasant day to do your work or plan to work in an enclosed garage.
Choose a day where you know you’ll have a few hours free to work.
Having to stop and pack up your tools and supplies due to rain is discouraging, and if you’ve got to drop everything and run to a commitment, you don’t want to do it with half-cleaned seats.
Plan Ahead to Reward Yourself When You’re Done
Plan to reward yourself for your hard work!
Make dinner reservations so you don’t have to cook a meal after working on your vehicle, pick up your favorite beer for when the job is done, or decide to reward yourself with a Netflix binge that evening.
Whatever you choose, decide to treat yourself for the work you’re about to do. We don’t want to delve too far into the psychology here, but rewarding yourself will make you far more likely to do the job again in the near (not distant) future.
Gather Tools and Supplies
If your vehicle has fabric car seats, you’ll need a bottle or can of all-purpose carpet and upholstery cleaner, such as the popular Resolve brand carpet and upholstery cleaner many car owners swear by.
Apex Auto Detail of Robesonia, Pennsylvania recommends Formula 409 Carpet Spot & Stain Cleaner as an inexpensive and effective fabric seat cleaner. It’s available at most big-box retailers and Amazon.
You’ll want a mild all-purpose cleaner when cleaning leather car seats, such as Murphy’s Oil Soap, and a bucket – or, if your seats are heavily soiled, a professional-level leather upholstery cleaner like Angelwax Heaven for Leather (also recommended by Apex Auto Detailing, above) an a leather conditioner.
If you’re on a tight budget, Country Living recommends a solution of three parts vinegar to one part water, in a spray bottle.
You’ll want to be sure that whatever you use on your leather will not transfer to clothing, so avoid homemade leather “cleaning” preparations that use food oils, which can transfer grease stains onto your clothes.
Do not use ammonia- or alcohol-containing products like glass cleaner, and do not use dish soap (which is far too harsh of a detergent) to clean leather car seats.
You’ll also need a wet-dry shop vacuum with a crevice tool attachment. If you’ve got fabric seats, make sure you’ve got the right filter for vacuuming water with your wet-dry vac. If you have leather seats, you won’t need to do any wet-vacuuming.
And finally, you’ll need a stack of microfiber towels and a soft bristle brush. If you don’t already have some, you should pick from the products in our guide to the best microfiber towels for cleaning cars.
How To Clean Car Upholstery – Step by Step! Let’s Get to Work on Your Seats!
Step #1: Vacuum Everything
If you have seats installed for children, you may want to remove them before you start, to get better results in your cleaning.
They’ll be a job all by themselves to clean, so don’t try to tackle them right now. Give them a quick vacuum and set them aside for later. Clean your children’s car seats as a separate project!
Set up your vacuum for dry vacuuming.
Remove any trash, pocket any loose change you find, and vacuum your seats well, using the crevice tool to vacuum seat seams and crevices.
Move the seat backs of any adjustable seats as far back as they go to get the crack where the seat back joins the seat bottom thoroughly clean.
Poke the crevice tool down into seat cracks, run it along grooves and seams in your seats, and push it around seat belt buckles and along the crevices where seats meet carpeting or trim.
And although this guide addresses upholstery specifically, if time allows, you may as well vacuum your car’s carpets while you’ve got the vacuum out.
Step #2: Clean The Fabric Or Leather
For leather car seats, mix your mild cleaner into a bucket of warm water per the instructions on the label.
Get a microfiber cloth or towel wet, wring it out slightly, and scrub the leather with your cloth, turning it frequently to expose a clean area, and rinse it as needed.
For heavier soil, wrap your microfiber around your soft brush to scrub a little harder or brush the surface of the leather with your soft brush directly.
Use caution around areas where your leather may be worn or cracked, and avoid hard scrubbing with your brush in these areas.
If you’re using a dedicated leather cleaner or the vinegar solution, spray the solution on the leather and clean a small section at a time, wiping up extra dirty liquid as you go and turning your towel to a clean spot often.
To clean cloth seats, test your car upholstery cleaners and carpet cleaner in an out-of-sight spot to be sure it’s safe for your upholstery. If you don’t have a dedicated fabric upholstery cleaner, you can use laundry detergent to clean cloth car seats.
Don’t worry if the fabric turns lighter in your test spot! That’s normal and means the cleaner is working. If all seems well after testing, generously spray down a section of the seat.
Allow the cleaner to soak in a little bit and then scrub the surface of the fabric with your soft brush, blotting up excess cleaner as needed.
Wipe the seats as dry as you can with a clean microfiber towel once the dirt loosens with your brush.
If there are still some dirty spots, you can repeat the process, or catch them in the next step, when you’ll use the wet-dry vacuum again. With stubborn stains, try mixing a ¼ cup of baking soda with a full cup of warm water (or use club soda), dab it on the stain, and then scrub the spot with a toothbrush.
Step #3: Getting Everything Dry
For leather seats or vinyl upholstery, grab a fresh, clean microfiber towel, get it wet with clear water, wring it out, and wipe down all the seats to be sure any remaining cleaner gets removed.
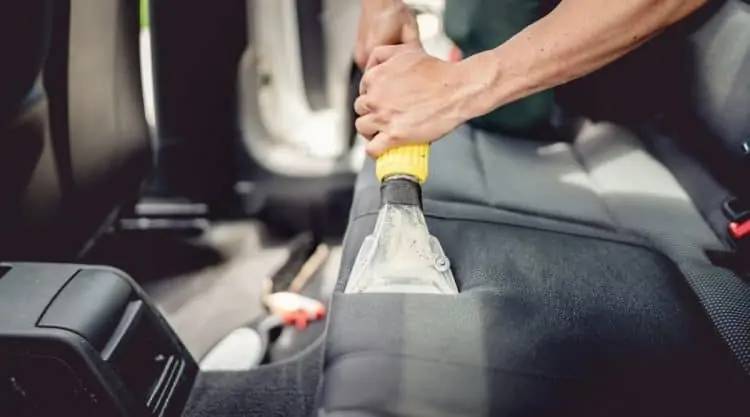
For fabric seats, empty the dust and dirt out of your wet-dry vacuum and switch the filter to one designed for wet use.
Spray additional cleaner, if needed, on areas which still look soiled.
Now, use the vacuum to extract as much moisture and remaining cleaner out of your seats as you can.
Here’s a short video demonstrating how well this technique works.
Finally, roll your car’s windows down, open the sunroof if you have one, and let everything dry thoroughly with the help of air flow.
If possible, park the vehicle in a sunny spot and let the heat of the sun help with drying.
Step #4: Finishing Up
Dispose of any dirty wash water, empty your wet-dry vac, and toss your dirty towels into the washer.
Put away your brush and any other items you’ve used.
Take a shower, put on some comfortable clothes, and take a well-deserved rest! You’ll still have to go to work next Monday, but your vehicle will be clean and fresh for your commute.
When your car interior is dry, reinstall any children’s seats you removed.
Consider installing the child seats on a protective pad designed for use under a car seat. We’ll discuss that in the next section.
Does It Matter If I Have Grubby Car Seats? Why Should I Bother Cleaning Them?
Selling And Trading-In For More Money
If you’re getting ready to sell your vehicle, or think you may trade it in on a new one in the future, you should know that a dirty car can cost you.
Tom Niejadlik, writing at Money Under 30, and with over 15 years of experience in the auto sales industry, says:
“A clean car speaks volumes for how you cared for your vehicle. In my experience, the clean cars I appraise are also generally the ones that have been well maintained mechanically.”
And Tom and Ray Magliozzi of CarTalk state:
“There’s a strategic reason why it’s important to get your jalopy spic and span. It suggests to a buyer that you’ve been taking good care of it or, at least, that you care enough to have it detailed. And that’s another step that will inspire confidence in the buyer – which gets you that much closer to an empty driveway and a check burning a hole in your hand.”
Nicer Smell
Car air freshener options abound at every grocery store checkout, we all know about that.
But clean and tidy don’t smell bad, making strongly-scented air fresheners, which cover up odors rather than eliminating them and which can sometimes trigger allergies and asthma, unnecessary.
That old-truck funk your pickup truck has is most likely from years of accumulated small spills and dropped food which has worked its way into your seats.
Get the seats cleaned and your vehicle will smell fresh.
Less Stress
Our cars are an extension of ourselves and our personalities.
They’re our mobile command post for our lives outside of our homes.
Most of us spend a fair amount of time in our cars, so cleaning up your upholstery will give you a sense of pride and accomplishment and make your commute to work a little less stressful.
And won’t it be nice not to have to apologize for the state of your vehicle when you pick up the other chaperone for the school field trip?
My Seats Are Clean, How Can I Keep Them That Way?
Now that you’ve done all the hard work, your vehicle looks great on both the outside and the inside, and you’re no longer afraid you’ll stick to your seat!
What can you do to keep things looking great?
1) Keep a stash of plastic grocery bags tucked into a seat-back pocket to collect cups, recyclables, and other trash at the end of a trip or the end of a day of running errands.
2) A plastic cereal storage canister makes a good trash can for snack wrappers and other small trash.
3) Use a seat protector pad below any installed car seats to help protect the car’s upholstery from spills and little shoes. For safety, use only a pad designed for installation under a car seat.
4) If you’re an avid coffee drinker, use a completely spill-proof travel mug, especially if you have cloth car seats.
5) A simple blanket in the back seat will protect your seats from the dog’s muddy paws. When the blanket gets too dirty, either wash it or replace it with another old blanket. Moving blankets from U-haul or Home Depot can work well, too, and don’t cost a lot of money.
If you want something that looks better than a moving blanket, pet supply websites sell nicely finished waterproof blankets designed just for cars, in colors to complement your car’s interior.
Cleaning Up Your Car’s Seats: Job Done!
Now your vehicle looks great on both the inside and out.
You’re armed and ready to keep your ride tidy and prevent future spills and stains.
Enjoy your clean, fresh car!
Fall in love with your ride all over again and take pride in the hard work you’ve done. Invite a friend out for a drive. Run your errands in peace, knowing your car looks great.
If you’re getting ready to sell, increase your asking price a bit to reflect how great your car interior now looks.
And, most importantly, be ready to hand off this article to any friends who ask where you got your car detailed!


