Detailing your vehicle is a hobby that anyone can enjoy, and there’s nothing like the satisfaction of seeing the gleaming results of your labor.
Aside from that, you’re also treating your vehicle to a much-needed spa day. Using restorative and polishing compounds protect, as well as refresh, the exterior.
One of the fundamentals any detailing enthusiast should learn is how to buff a car. If you’ve mastered standard washing and using a clay bar, this is the next step up.
In this guide, you’ll learn the benefits of buffing and when your vehicle may be in need of it. We also discuss how to choose suitable pads and products for the job.
We share the different methods available and what tools you can use and you’ll also learn how to handle motorized devices, as well as tips for doing it by hand if you don’t have electric tools.
Skill Level: Beginner.
Time to Complete: Approximately 3–4 hours depending on the size of your vehicle and method of buffing.
Tools Needed:
- Gloves and mask.
- Car shampoo or car wash soap.
- Bucket and access to a water source.
- Car wash mitt or sponge.
- Clay bar and lubricant.
- Car-safe microfiber towel.
- Masking tape.
- Restorative or polishing compound.
- Microfiber cloths.
- Either a high-speed orbital buffer, random orbital buffer, or buffing pads (both a wool pad and yellow foam pad).
- Attachment pads, if you’re using a motorized tool.
Key Takeaways
Motor or Manual? – Buffing manually will save you money and make damaging your car less likely, but a motorized buffer will save you a lot of time and effort.
When to Buff – If your vehicle has light scratches or the clear cut is looking dull, a good buff job can restore the gleam.
Easy Does It – Whether you’re buffing manually or with an electric tool, applying too much pressure could damage your car’s exterior.
How to Buff a Car – Step-by-Step Instructions
The rest of this article will take through the reasons behind buffing and how to choose the right tools for the job. For now, let’s dive straight in with the simple steps you need to follow when buffing your car with either motorized or manual buffers.
Step 1: Park in a Shaded Area
Set up your supplies and park your vehicle in a shaded, well-ventilated space. If you parked or drove out in the sun for a while, give the bodywork time to cool off.
It should never be hot to the touch when you begin any type of detailing work. Plus, the sun’s rays are capable of destroying certain chemical bonds. You don’t want this happening as you work.
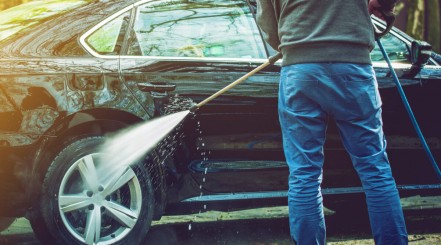
Step 2: Give Your Car a Good Wash
Ready your car shampoo, car wash mitt or car-safe sponge, and bucket.
Wash the entire vehicle from trunk to hood. Don’t rush through this step – get into all the nooks and crannies on the vehicle’s exterior until the whole vehicle is squeaky clean. Treat each section with care, paying special attention to the areas pooped on by birds.
Rinse your car until no traces of soap remain, then use your microfiber towels to dry it off.
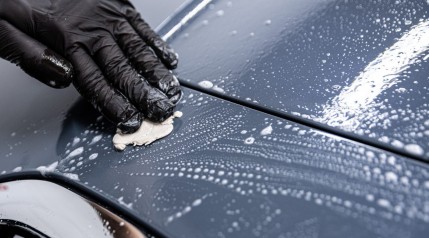
Step 3: Clay Bar After Washing
Using a clay bar will ensure there isn’t any grime or grit left on the surface of the car. If left on, these sorts of contaminants can be ground into your paint.
Spray your clay bar lubricant in small sections, then get to work with the bar itself, using a gentle side-to-side motion. If you encounter resistance, spray more lubricant.
Check the bar for dirt every so often. If you find any, remove it before restarting.
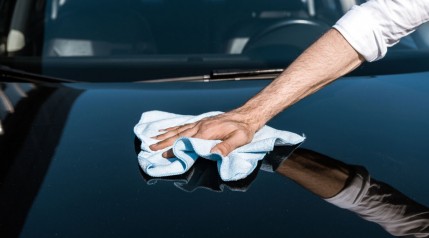
Step 4: Re-Wash and Dry Your Car
Once you’re finished, rewash the vehicle. Rinse it as you did earlier, ensuring no soap residue remains. It’s essential that the vehicle is fully dry before you start buffing.
Step 5: Set Up Your Tool of Choice
If you’re using a high-speed or rotary buffer, or a random orbital buffer, set the speed to low to avoid burning your paint. If you’re doing the buffing manually, get your gloves on.
Step 6: Apply Buffing Compound
Apply the compound you’ve bought as directed. Some will require that you apply the substance to both the vehicle and the pad itself. Follow your product’s instructions.
Similar to when you use a clay bar, you’ll be treating small areas at a time.
Step 7: Spread Compound Evenly
If you’re using a tool, don’t switch it on straight away. Rub the pad over the surface of your car to spread the compound out evenly.
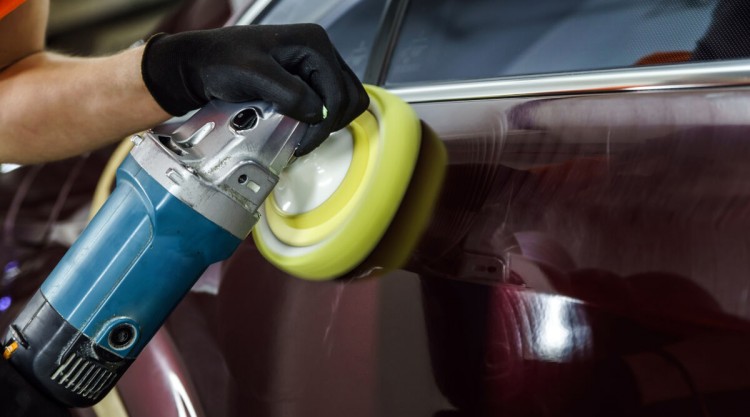
Step 8: Buff Your Car – Techniques To Use
The key to successful buffing is a steady hand and regular motions. You should avoid staying in one spot for too long or applying too much pressure.
Using a Motorized Buffer
Begin buffing by gliding the pad over your starting body panel in circular motions. You don’t need to use all your strength to push the pad down, especially with a high-speed model. Light pressure will do it.
Having said that, you should still make sure it has firm contact with the car’s surface. Move it over the section until the entire product you applied has been absorbed. When it’s nice and shiny, you can stop.
Hand-Buffing
You’ll have to apply more pressure to a pad than with a motorized polisher. Work in a circular motion.
It may be hard to do after a while, but don’t ease up on the pressure. Otherwise, you could end up with an uneven or blotchy surface.
Once there aren’t any visible traces of the product left, and the area is gleaming, you’re done.
What Is Car Buffing?
Buffing basically involves removing a very thin layer of your vehicle’s paint or clear coat. This might sound disturbing, but if done correctly, no vehicles will be harmed in the making of this buffing!
The purpose is to get rid of minor defects on the layer you’re wearing away while keeping it perfectly blended and indistinguishable from surrounding areas.
Pads (machine attachments and for manual use) come in various materials. They’re responsible for distributing the buffing product of your choice evenly over your car.
On that note, there are also hundreds of buffing compounds and polishing products. Some are for specific colors and types of paint; others are for specific types of damage, for example, paint oxidation.
Please know though, that buffing a car isn’t a miracle cure-all, despite what you might’ve heard.
If your car’s paint is worn down to the primer or bare metal, serious intervention is required. The same is true of large dents, chips, or deep scratches.
When Does a Car Need Buffing?
If your usual wash-and-clay routine isn’t getting results, it may be time for a buffing. Here are a couple of signs you might need to go further:
Paint Is Scratched or Swirled
Low-hanging branches, clumsy drivers, or curious wildlife can all cause minor scratches to your paint.
Improper washing techniques and supplies can also cause the paint to appear swirled or dull. (If you’re already in such a situation, read this article on how to remove your swirl marks).
Using rough towels or sponges that aren’t safe for automotive paint may not do damage one single time. But if you do this with every wash, you’ll eventually leave visible marks and surface scratches. You can also leave small scratches if you misuse a clay bar.
Paint Looks Dull or Faded
Paint that has lost its shine or looks faded has begun to oxidize. Don’t panic just yet – oxidation doesn’t necessarily mean rust is imminent. All it means is that the paint is reacting with oxygen, breaking it down. This is a natural event that can’t be prevented. Still, years can pass before dullness or fading manifest and buffing can help to mitigate the problem.
The Different Ways You Can Buff Your Car
There are two options at your disposal here: use a machine or buff by hand.
An electric buffer can save you time but carries a risk of misuse. If you aren’t sure of what you’re doing, you can scuff your paint. Worst case scenario, your vehicle might look worse than when you started.
Motorized Buffing
These machines can vary dramatically in quality, power, and size. There are two basic types: rotary, which are also known as “high-speed” machines, and orbital.
Rotary (High-Speed) Machines
Rotaries tend to look like angle grinders, but with a handle to the side. The pad attachment and backing plate rotate in a circle, in one direction.
The outer diameter of the pad will spin at a faster rate than the inner diameter. This means that they can generate more heat than an orbital model.
You have to be wary of these, they’re powerful. They work rapidly to eradicate defects – and can just as quickly burn through your paint.
Orbital Machines
Most of these resemble dual-action sanders. The backing plate and pad attachment spin at a separate axis from the spindle.
The handle is either at the top or to the side of the tool. Some may have a rubber surface so that you can grip the body rather than a handle. Pad rotation can be free spinning, forced, or both, based on the model. You can vary the speed as needed.
This range of motion makes them forgiving for beginners. They’re not as aggressive and don’t generate a lot of heat. As long as you’re reasonably attentive, you’ll be hard-pressed to cause any serious harm to your paint job.
Manual Buffing
Buffing by hand only requires that you choose a suitable pad and product. Your hands and a little elbow grease are the only other things you’ll need to get started.
You have more control over your hand than a machine, but it can be time-consuming and tiring.
How to Choose the Right Buffing Pad and Product for Your Car
You should take care when choosing a pad and a rubbing or polishing product. It is possible to mix and match pads and compounds, but you need to be cautious.
Pad Material
There are four general categories of pad materials. These include:
- Foam
- Wool
- Microfiber
- Glass
The types you’re going to be looking at will likely be wool, microfiber, or foam. Glass pads are only appropriate for scratched or scuffed glass. They can’t be used on other surfaces, like paint or plastics.
Foam pads are absorbent and resilient, and they can be manufactured to be rigid and hard, or soft and flexible.
Wool pads are most often used with high-speed rotary models. The wool may be synthetic or natural, depending on the brand.
Microfiber is a relatively new addition to the market. These pads may also include foam as part of the design.
Level of Abrasiveness
Whichever material you choose will be graded according to how abrasive it is. From most to least aggressive, the types of pads include:
- Compounding
- Polishing
- Finishing
The same goes for the products you apply to your vehicle. For example, sealants and waxes are finishes, meaning they’re not at all aggressive.
Compounding products are coarser for smoothing out imperfections. If misused, they can do more harm than they repair.
The Tool You’re Using
Bear in mind that certain tools are formidable. If you’re using a high-speed polisher, you may want to pick a less aggressive pad and product to give more margin for error.
Friction is what happens whenever two solid surfaces come into contact repeatedly. The greater the friction, the hotter it will get.
Controlled friction is beneficial – it’s what will eradicate defects in your paint job. In excess, it can be damaging. This is particularly applicable if you’re not confident in your skills yet. It’s better to choose a gentler alternative to avoid harming your paint job.
Buffing Complete!
Knowing how to buff a car has a learning curve. Don’t be disheartened if your first attempt doesn’t look entirely professional. You can only get better with practice, and your vehicle will thank you for it.
The important thing to keep in mind is to respect the tool you’re using. Motorized polishers can be wonderful gadgets if they’re used properly, but don’t push yourself beyond your comfort zone and risk causing damage.
Do you have questions for us or experience in buffing your car that you’d like to share? If so, please leave us a comment below and we will get back to you.