Modern cars are equipped with sensors to monitor a range of operations. These transmit information to your onboard diagnostics system (OBD-II). If something is malfunctioning, you’ll know what, where, and why courtesy of that little check engine light on your dash. These components take the guesswork out of identifying complications in your car.
All sensors will get dirty with regular use and cleaning them is a maintenance task we recommend carrying out at regular intervals so normal function isn’t impaired by grime.
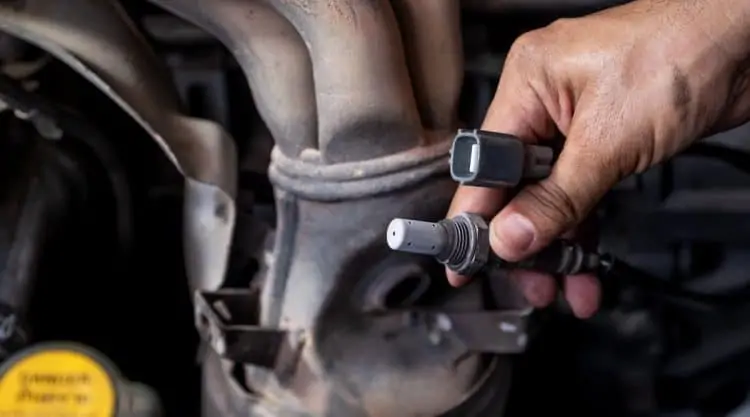
This particular article will teach you how to clean an O2 sensor, the part of your car responsible for regulating oxygen flow to the engine and a key player in the engine’s combustion process.
You’re going to learn how to clean oxygen sensors with and without removing them. We also tell you how they work, why they’re important, and what might happen if you have a faulty sensor. If you’d rather go down the professional route, we have info on that for you too.
Key Takeaways
- Symptoms of O2 Sensor Trouble – The main symptoms of a dirty oxygen sensor are decreased fuel efficiency, exhaust smoke, decreased engine performance, poor acceleration, misfires, and rough idling.
- Two Cleaning Methods – You can clean your oxygen sensors with a specialized product or with gasoline. Using a specialized product is the easier of the two options.
- Frequency – Your driving habits will determine how often you need to clean your sensors. With lesser-used cars, you might only need to clean them once per year. Vehicles driven daily may need as many as four cleans or treatments per year.
Contents (Jump to Topic)
- 1 Key Takeaways
- 2 What Is an Oxygen Sensor and What Does It Do?
- 3 How Can You Tell if an O2 Sensor Needs Cleaning?
- 4 How to Clean an O2 Sensor With a Product
- 5 Cleaning an Oxygen Sensor With Gasoline
- 6 Going to a Professional to Clean O2 Sensor: What to Expect
- 7 How Often Should You Clean Your O2 Sensors?
- 8 Conclusion
What Is an Oxygen Sensor and What Does It Do?
It plays a key role in your vehicle’s emissions control system (EMS). Each one detects how much oxygen is passing through your exhaust system.
When oxygen levels get too low, the catalytic converter is affected. The catalytic converter is the part that converts harmful pollutants, like hydrocarbons, to reduce toxic emissions. Clearly, this isn’t something that you want to malfunction.
A catalytic converter requires oxygen to perform this essential task. The catalyst that is responsible for conversion can’t operate efficiently without it.
Depending on the US state you’re in at the time, driving with a faulty catalytic converter can result in a warning or a fine. It’s not something you can hide—a smoky exhaust pipe is one of the telltale symptoms. If you have emissions problems, cleaning your catalytic converter is a course of action to consider, as well as cleaning your O2 sensors.
It would make sense to assume that all cars have the same amount of O2 sensors, but that would be too easy. Most vehicles have four sensors, but you need to check your vehicle’s manual to confirm exactly how many you have. The total entirely depends on the make, model, and age of your vehicle.
How Can You Tell if an O2 Sensor Needs Cleaning?
Your vehicle will tell you through the check engine light. You may also notice the symptoms of a struggling catalytic converter.
These include:
- Higher gas consumption.
- Exhaust smoke.
- Decreased engine performance. Your car may not accelerate normally, and misfires and rough idling can occur.
The most reliable way of diagnosing a dirty unit is to use your OBD-II scanner. The error code will tell you if your emissions system is in trouble, and, if so, what parts are affected.
How to Clean an O2 Sensor With a Product
The most common products contain solvents formulated to break down accumulated debris without damaging anything.
Note that you should never use non-automotive solvents on or in your vehicle. The chemical structure of various products can differ based on the intended use.
Equipment Needed:
- Catalytic converter cleaner (also marketed as “emissions system cleaners”).
- Access to a gas station or a canister of your vehicle’s preferred fuel.
Step-by-Step Process:
The treatment is straightforward. You’ll be done before you know it in just three simple steps:
- Buy the right product.
- Use as directed.
- Drive around to circulate.
Step 1: Buy the Right Product
Before you make a purchase, check that the product suits your engine type. Some brands aren’t universal and may only be suitable for either diesel or gasoline engines.
Read the product description, too. Those of you with bigger vehicles may need a larger quantity.
Step 2: Use as Directed
Review the instructions on the bottle or included manual. This will tell you how much gas you should have in your tank before treating it with the product.
You might have to run your tank almost empty or fill up on fuel. Follow the guidelines as closely as possible.
Step 3: Drive to Circulate
Take your vehicle for a spin to allow the product to circulate. The distance you’ll have to travel and other recommendations for distribution will be brand-specific.
Cleaning an Oxygen Sensor With Gasoline
If a commercial product wasn’t successful, there’s another option for you. It will require that you remove the units, so make sure you are comfortable doing this. If not, please seek the help of a qualified technician or someone who knows what to do. You could injure yourself or accidentally cause damage.
Gasoline does more than power motors. It’s enriched with additives that act as detergents to target and prevent engine deposits from building up. Unlike vinegar or household detergents, gasoline shouldn’t harm the components of your car.
Equipment Needed:
- Safety goggles, mask, and rubber gloves.
- A car jack and good, reliable jack stands.
- Gasoline-safe container with a lid.
- Oxygen sensor wrench.
- Penetrating oil.
- 1 gallon of gasoline.
- Soft-bristled brush.
- Paper towels.
- Shop towel.
Step-by-Step Process:
This is a little more complex than using a product. The steps for removal and cleaning are as follows:
- Safety comes first.
- Let the engine cool and jack your car up.
- Put a shop towel on the floor.
- Locate sensors.
- Spray penetrating oil.
- Remove using your wrench.
- Fill the container with gasoline.
- Put sensors in the container.
- Add gasoline if needed.
- Seal the container and agitate.
- Let it sit overnight.
- Put a fresh shop towel down.
- Lightly scrub.
- Dry with paper towels.
- Re-install.
- Dispose of used gasoline.
Step 1: Safety Comes First
Gasoline must be handled with care. Your work area has to be spark-and-smoke-free throughout the cleaning process. Children and pets must be kept away.
The gloves you choose have to be rubber as you’ll be in contact with the fluid. The liquid will seep through cloth gloves and irritate your skin.
Choose an area with good ventilation and wear a mask and protective eyewear. Excessive inhalation of the toxic vapors can result in gasoline poisoning.
Step 2: Let Engine Cool, Jack Car Up, and Lay Your Shop Towel
Your car should be cool to the touch before you handle delicate components. No one wants to be scalded by a boiling-hot exhaust pipe.
Set your shop towel on the ground to protect it from stains. This is where you’ll be placing the components.
Step 3: Locate Sensors
All the units should be located near your catalytic converter on top of the exhaust manifold. Your owner’s manual will tell you how many sensors there are and their exact locations. A sensor is around 2 inches big and has a hexagon shape.
Step 4: Spray Penetrating Oil
Coat the sensors with penetrating oil first to save yourself some elbow grease. They might not come out easily without it.
Step 5: Remove Using Wrench
Use your oxygen sensor wrench to loosen them one by one from their fittings. Unplug and remove them, setting them down on your shop towel.
Step 6: Fill Container With Gasoline
Pour gasoline into your container until it’s a little more than half full. You don’t want to fill it to the brim, or it will overflow when you put the components in.
Step 7: Put Sensors in Industrial Container/Bucket/Plastic Bowl and Add Gasoline if Needed
Gently place them into the gasoline bucket/container one at a time, making sure they’re fully immersed. This isn’t water you’re dealing with; splash-back should be avoided.
If any parts of the units are sticking out, pour in more gasoline until they’re submerged.
Step 8: Seal Container and Agitate
Close up or cover your container. Pick it up and carefully agitate it to ensure that the fluid covers the entire area of the components.
Step 9: Leave to Soak Overnight
Put your container somewhere cool, dry, and out of the way. Give the gasoline one night to break down deposits.
Step 10: Lightly Scrub
In the morning, open up your container. Don’t forget to re-apply all your safety gear (gloves, mask, and goggles) before you do so.
To clean the oxygen sensors, scrub each unit with your soft-bristled brush before putting them on the shop towel. There’s no need to be aggressive as this is just to clear off loosened debris.
Step 11: Dry With Paper Towels & Reinstall
Dab at the units with paper towels until they’re thoroughly dry. Using your O2 sensor wrench, reinstall them, tightening until they’re secure.
Step 13: Dispose of Used Gasoline
The gasoline in the container is now contaminated with deposits. Find a recycling center near you to get rid of it safely.
You have now successfully uninstalled, cleaned, and reinstalled your O2 sensors. Congratulations!
If the previously experienced symptoms remain, there might be something else that needs investigating. Consider consulting a professional at this stage.
Going to a Professional to Clean O2 Sensor: What to Expect
There’s no shame in deciding you’d rather leave it to the experts. You can either take your vehicle to a mechanic or go to a carbon cleaning center.
Carbon Cleaning Center
These businesses are dedicated to professionally cleaning carbon deposits out of vehicles. Search online to find one near you and request a quote for your O2 sensors.
Professional Mechanics
Your mechanic will likely first suggest that you try a commercial catalytic converter cleaner. If that fails, the next offered solution will be a replacement.
Including the new components, this ranges from $200–$400. The price will be calculated according to your vehicle, the number of sensors, and the garage itself.
How Often Should You Clean Your O2 Sensors?
Use a catalytic converter cleaner, or visit a carbon cleaning center, every so often. The former is a cheaper way to keep these units functional and debris-free, and will also help clean fuel injectors, your combustion chamber, and fuel lines.
Your driving habits will determine the frequency of cleaning required. Lesser-used cars won’t need to be treated as often—once per year should suffice. Vehicles driven daily may need as many as four doses or treatments per year.
Conclusion
We hope you’ve enjoyed learning how to clean O2 sensors. Maintaining your emissions system will contribute towards reducing debris internally and pollutants externally.
This means addressing issues (e.g. leaking gas) when they crop up. Additionally, you should follow up with regular treatments with catalytic converter cleaning solutions.
Prevention is always an easier strategy than repair. Why wait until the units or other parts are so filthy that they stop working and you have to be replaced?
Do you have questions for us about this topic? Don’t hesitate to ask in the comments below. We welcome your opinion!


