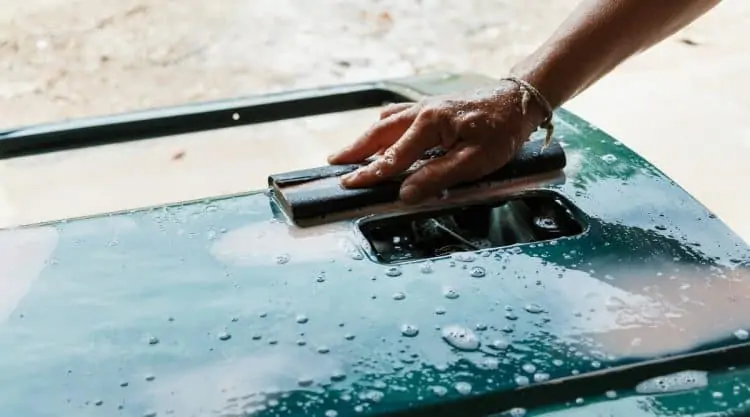
Wet sanding is a process where sandpaper is used to restore smoothness and shine to your car’s paint job. While this is a delicate process, it’s a task that anyone can carry out with a little know-how and the right tools and supplies.
In this article, we’ll be walking you through the entire process of how to wet sand a car, starting with gathering all the equipment and tools you’ll need to make this successful, as well as the reasoning behind doing it in the first place.
Ready? Let’s begin!
Key Takeaways
Take Care! – This is a highly delicate process, so take your time and make sure you follow the instructions below to a T.
Gently Does It – Rubbing too hard will damage your basecoat, which could result in a costly repair bill.
Worth the Effort – Wet sanding can turn your vehicle’s paint job from fugly to fabulous, and all it takes is a little know-how and elbow grease.
What Do You Need to Wet Sand Your Car?
The following is a list of items and materials you’ll need to gather before you start wet sanding your car:
Appropriate Sandpaper
It does seem obvious, but you’ll need the right type of sandpaper.
Never use less than 1200 grit sandpaper on a car’s paint as these will leave sanding marks. For deeper scratches, you’ll need to start with 1200 or 1500-grit papers. You will then repeat the process with finer sandpaper to get a nice, smooth surface.
If the damage is light, finer sandpaper such as 2000 or 3000 grit will do the job in one go.
Lubricant (Water and Soap)
There’s no need for any expensive lubricants here – all you need to do is to fill a bucket or spray bottle with water and dish soap.
Make sure that the soap is NOT fit for use with wax or polish. You can use dish detergent.
Hand Scissors
You will need a pair of hand scissors to cut the sheet of sandpaper into strips. Standard safety measures apply here when handling scissors.
Sponges and Microfiber Towels
Before starting the procedure, the area must be perfectly clean and dry. After you’re done, you’ll have to wash and dry the area again.
This could be a small part of the car body, or the entire car, regardless you will need a good car wash soap, sponges, buckets and microfiber towels to perform a thorough cleaning and drying.
A Pad or Squeegee
Working with your hands alone will cause an uneven sanding job. Wrapping your sandpaper around a sanding block, sanding pad, or sanding squeegee is the proper way to do it.
Sanding squeegees have different handles, depending on the angle you want to work at. Choose the one that makes your job easier on different parts of the vehicle.
Garden Hose
After treating the area, you will need to rinse it thoroughly. A hose will be useful, especially if you’re sanding the entire vehicle.
We’ve suggested a garden hose, but if you don’t have easy access to that right now, any high-quality hose should work just fine.
Power Buffer
After sanding, it is essential to polish your car. A power buffer is designed to do just that.
High-Grade Car Wax
Waxing your vehicle will help give it that brand-new glossy finish we all look for.
Also, if you’re sanding only a smaller area, waxing it will correct any imperfections. Plus, it will protect your car’s paint finish once you’re done.
Now that you know about all the different items you need to gather before starting the process, let’s look at the actual steps of wet sanding your car.
How to Wet Sanding a Car: Step-by-Step Instructions
The following is a list that discusses – step by step – how you can wet sand your vehicle the right way.
1. Prepare the Lubricant
Fill a bucket with water and automotive soap. If that’s not available, dish detergent is fine.
Do not use soapy water that’s fit for use as wax or polish.
2. Cut and Soak the Sandpaper
It’s better to cut each sheet in half. Longer strips will be easier for wrapping the sandpaper around a buffing pad or squeegee.
Leave the strips of sandpaper to soak in the lubricant for at least 5 minutes.
Make sure to leave a dry part that will be wrapped around the pad or squeegee.
3. Wash the Part You Wish to Sand
If you are doing the entire vehicle, wash it normally with soap and water, and remove any dirt or dust.
After it gets clean, dry it well using microfiber towels. The same applies if it’s only a specific part.
4. Start Sanding
One last note before you start sanding: make sure the sandpaper is wet.
Fasten the wet sandpaper onto the squeegee following the instructions you’ll find included with the squeegee.
It’s best to pick a small area of the bodywork to begin with. Start sanding gently, using circular motions or a back-and-forth motion with light pressure. Never apply too much pressure.
If there’s a lot of paint bleeding onto the sandpaper, this is a clear sign that you’re pushing too hard. By doing so, you risk damaging the base coat of the paint or having an inconsistent finish. It’s worth repeating: never wet sand the basecoat! This will remove the color from your vehicle and result in a costly visit to the repair shop!
Be gentle and consistent, always applying the same amount of pressure over the entire area.
5. Keep Lubricating
The sandpaper should always be kept wet. Never let it dry completely as you work. You can soak it again, or also keep pouring soap and water on the car surface evenly as you go along.
The liquid will save your paint job from being ruined by the sandpaper.
6. Treat the Sanded Area
To get rid of deeper scratches, you’ll require coarser sandpaper, such as 1200 or 1500 grit.
Sanding scratches your paint layer, which is why deeper-scratched areas need to be wet sanded again.
This time, use finer sandpaper such as 2000 or 3000 grit. By doing this, all imperfections should be gone.
7. Rinse the Area Thoroughly
Once you’re finished treating the area, rinse it very thoroughly. Use a hose and plenty of water to get rid of any soap.
By the time you’re done, the car’s surface should feel clean to the touch.
8. Dry the Area
Once the area or whole vehicle is rinsed, make sure to dry it thoroughly using microfiber towels.
Do not let your vehicle dry in the sun! Direct sunlight may cause watermarks.
9. Polish and Wax
The easiest way to do a good job is by using rotary buffers (also referred to as a rotary polisher).
Be sure to only use medium-speed and low-pressure settings for the purpose of this task. High-pressure will damage the car’s paint job, so be gentle when polishing. If you pick up any dirt as you go, this can leave swirl marks, so be sure to clean it off ASAP.
The final touch to wet sanding a car is to get it all glossy and looking brand new is to wax it with a rubbing compound.
For this purpose, be sure to use a high-grade wax. This will even out any imperfections and protect your car’s paint against fading.
Why Should I Wet Sand My Car?
Usually, this procedure is done after your vehicle has had a paint job.
New paint sometimes has a slightly uneven texture, which is referred to as the “orange peel” effect. Wet sanding will smooth this out and give a shiny finish to your vehicle.
It will also remove any dirt that may have landed on your vehicle while it was being painted.
If your car hasn’t been painted recently (or has had a sketchy spray paint job), wet sanding can also be used to correct scratches left on the paintwork or clear coat and any other imperfections. It works very well, provided that the scratches aren’t too deep. If the metal is showing through the paint, wet sanding the vehicle will not be appropriate.
A word of warning, though: wet sanding must be done properly and very carefully, or else you’ll regret it afterward. A single mistake could create heavier damages than the ones you’re trying to conceal in the first place.
Also bear in mind that there are situations when wet sanding won’t work – for example, if you have deep scratches in the clear coat and paint.
Not to worry, though – we’ll guide you through the delicate wet sanding process step by step, and explain everything in-depth so that you know exactly what you’re getting yourself into and what you need to do.
By the time you’re done reading this article, you’ll learn how to wet sand your car like a real pro!
Can You Ask for Professional Help?
Yes, you sure can! If you don’t feel comfortable doing this job by yourself, you can seek a professional for help instead.
With that being said, be aware that some shops will not agree to do it unless they have done the paint job themselves. This is because they want to be sure that they can do a good job and not cause any damage.
The cost of wet sanding your vehicle at a professional shop can vary greatly, depending on the severity of the imperfections that need to be concealed, the type of vehicle, and other factors. Usually, a fair cost ranges from $150–$450.
Final Thoughts
So, you now know how to wet sand a car! See, it wasn’t that hard, was it?
This is a very delicate process and there’s absolutely no room for mistakes, though, so you absolutely have to follow all the steps mentioned to a T. It is essential that you take your time and are very careful.
And always remember: if you aren’t comfortable doing this yourself, then please hire a professional to do the job for you. Sure, it’s going to cost you some money, but you may end up paying even more money if you do it yourself and cause damages to your vehicle’s exterior.
We’ve given you all the tips and advice to follow for doing it like a pro, but whether you want to try to do it yourself or seek the help of a professional, we’ve got you covered!
Have you ever tried wet sanding your car? Let us know all about it in the comments, and feel free to ask us any additional questions you might have!


