DIY Car Repairs 101: Covering a Broken Car Window
We always think that a broken car window is another person’s misfortune … until it happens to us! The fact is that it can happen to anyone, anytime. Whether it’s a broken side window, rear window, or your windshield, there’s no legislating for it, and little you can do to prevent it.
Most vehicle owners expect thieves and break-ins to be the cause of broken car windows, but breaks can occur in several ways: heavy hail, a collision, or even a stray stone hitting the window in the wrong place.
When it does happen, replacing the window isn’t as simple, cheap, or quick a process as we’d like. A busy schedule, lack of budget, or difficulties sourcing a replacement might mean waiting days before you can get it fixed. In this case, you’ll need a temporary cover to protect yourself, your passengers, and the inside of your vehicle from the elements.
The good news is that covering a broken car window is easy. In this post, we reveal three methods you can use to get the job done, along with easy-to-follow, step-by-step instructions.
Covering a Broken Car Window: Key Takeaways
Don’t Use Cardboard – This is the last option you should consider when covering your car’s broken window
Prep Properly – Make sure you tidy and clean the break before installing your temporary window cover
Check First! – Check with your local authorities to make sure your temporary car window cover will be roadworthy and legal
How to Cover Broken Car Windows? 3 Methods
Covering the opening before getting it fixed isn’t complicated, and is a task that most people can handle on their own.
Preparing the Surface to Cover
Before covering the opening, you’ll need to clean and secure the surface from glass debris.
Items Needed
To properly and safely prepare the area, you’ll need the following items handy.
- Small hammer or another heavy tool.
- Gloves: Should be made of strong and thick material to avoid cuts.
- Microfiber cloth.
- Vacuum cleaner.
- Masking tape.
Removing Glass Debris
If glass pieces still stand strong, you’ll need to remove them first. Wear gloves to avoid cuts, and use a hammer to detach the most stubborn pieces of glass.
In most cases, glass shards from your broken window will have fallen inside your vehicle. Use a vacuum cleaner to clear the seats, carpets, and headrests. Use a small attachment to remove debris from the window seal as well.
Dusting Off
Before covering the broken car window, wipe down the glass and remove any dust and dirt from the outside frame. To avoid scratches, it’s best to use a microfiber cloth.
This will ensure that the masking or duct tapes stick properly. It also prevents moisture and water from getting in.
You can also wash the outside frame with water or a wet cloth if you feel the need to. Just ensure that it’s fully dry before using any tape.
Masking Tape
Using masking tape is often overlooked, but can save the car paint around your window frame. Applying duct tape directly will likely chip the paint and leave a residue, so you don’t want to do that.
Cover the frame with a layer of masking tape about two inches wide. You can then safely apply duct tape on top of it.
This step will be a prerequisite for every cover (except the crash wrap) described below.
Method One: Clear Duct Tape
Covering a broken car window with duct tape requires only one item that you may already have at home. If not, you can pick it up for a few bucks in a hardware store.
Covers made of duct tape are popular, as they’re sturdy and help keep the moisture out.
Here’s how to do it:
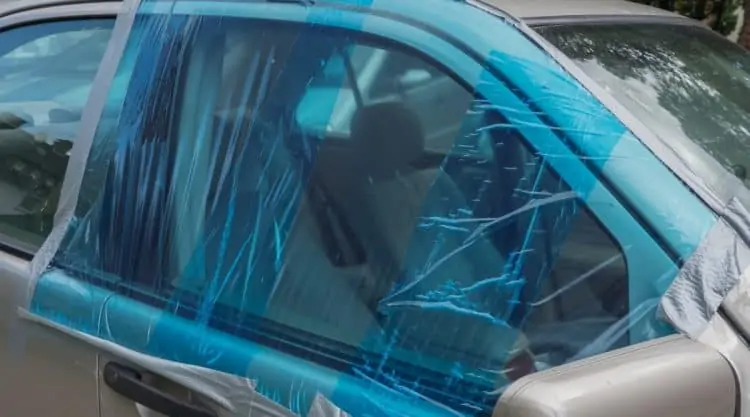
- Open the car’s door to start taping from the inside of your vehicle. Lay strips of your clear duct tape vertically, starting from one side of the window to the other. Make sure that the strips overlap until they cover the entire window/space.
- Repeat the above process, but this time lay the strips horizontally. This will ensure that your cover is now stronger and more durable.
- Once the opening is entirely covered horizontally and vertically from the inside, repeat the process on the outside.
Method 2: Crash Wrap
Crash wraps are the fastest and easiest way to cover a broken car window opening.
The best crash wraps protect your vehicle’s interior from ultraviolet light and are also water and weather resistant.
The plastic sheet can be applied directly to your vehicle without chipping the paint. As you remove the cash wrap to proceed with a permanent repair, simply tear it away.
They can last from a few weeks to a few months without deteriorating. It doesn’t stick to itself and can even be applied to a frozen surface in winter. If you’re planning to drive, it should withstand a speed of 50 miles per hour.
Here’s how to use your crash wrap on broken windows:
- Before installing the wrap, remove any remaining glass debris from the area. You’ll also have to clean any dirt and dust from the frame. However, you won’t need to apply masking tape.
- Crash wraps come as a wide plastic roll. Stick the length of the roll on one side of the opening and roll it over the other side.
- Cut at the desired width and press the plastic against the frame.
- And that’s a wrap!
Method 3: Plastic Bag
Using a plastic bag is a convenient way to temporarily cover a broken car window if you’re not planning to use your vehicle for the time being.
You’ll have to consider the type of plastic bag you’ll be using, though. If you manage to get your hands on some, high-density bags are preferable. They’re thicker and offer better protection. You can use a high-density, heavy-duty trash bag if you have some at home.
On the other hand, low-density bags (such as low-density garbage bags) tend to puncture easily, and you’ll end up with a hole fairly quickly.
To use a plastic bag:
- Start by fixing the plastic bag from the inside. The bag should be tightly sealed over the frame, or else it will flap and potentially break and fly away.
- This may become a safety hazard when driving, especially at high speeds. This is why it’s best to use plastic bags as a cover only if you’re not intending to drive while you have this system set up.
- It can be difficult to stretch the bag on your own while placing the duct tape around, so you’ll need a second pair of hands.
- Place duct tape all around the frame and ensure that it’s fully sealed. Add an extra layer of duct tape if needed.
- For extra protection, repeat this process from the outside with a new bag.
- You can also tape over the bag itself, applying layers of duct tape all over the opening in horizontal and vertical layers.
What About Cardboard?
Cardboard is the last option you should resort to, and only then if you have nothing else available.
Even if you won’t be driving, it has a few disadvantages you have to know about.
First, cardboard isn’t see-through and will block your visibility, creating a safety hazard on the road. If not secured properly with duct tape, flying cardboard could cause serious accidents.
Also, when it rains, cardboard retains moisture and is hard to dry. After a few days of rain, water could leak inside the car.
Other Things to Consider
When applying a cover, always use a transparent, see-through material. Colorful covers reduce your visibility, which can pose a great safety risk to you and everyone around you at the time you’re driving.
Duct tape, plastic bags, and crash wraps are all available in a transparent color.
Also, be sure to check the regulations of your local authorities before you ever install a cover on your broken window. It’s sometimes illegal to drive with a plastic cover, even if you’re only doing this temporarily.
Last but not least, remember that the covers should always be a temporary fix until you can replace the broken car window, and not a permanent solution!
Why Should You Cover Your Broken Car Window?
Ideally, a broken window should be replaced with hard glass immediately.
Realistically speaking though, this isn’t always possible. For the most part, you might need to use your vehicle for a few days before you can get to a certified auto glass repair shop.
So, temporarily covering it until you can install a glass replacement is important for several reasons:
Appearance
When faced with driving a car with broken glass, our priorities might shift and appearance might be the last of our worries.
For some of us, however, this isn’t the case. Keeping a clean, neat look is essential for many people, no matter what the circumstances may be.
Covering a car window doesn’t have to be a messy process. When done properly, a cover will give a much more polished look than just leaving broken glass there unattended.
Keeps Yourself and Your Passengers Safe
Whether the broken glass is on the passenger or the driver’s side, it still remains a hazard for everyone inside the car.
While driving, small glass pieces can easily detach and fly inside the vehicle. Possibilities of where they can land are unfortunately endless. They can get into your eyes, seats, a kid’s car seat, and so on.
They can also fly outside, potentially harming pedestrians walking by. If it falls on the road, a piece of sharp broken glass can cut through the rubber tread of someone’s car or bicycle tire.
Protects Against Whether
Although a temporary cover won’t fully protect your vehicle from all weather elements, it still provides a good temporary safety layer. A rainy day would be disastrous for any car with a non-covered broken window.
Without a proper cover, strong winds could bring debris, dust, and small objects inside your vehicle, potentially damaging the interior in the process.
If your car interior is covered with a delicate material, such as leather, sun exposure could also cause great damage.
Avoid Easy Access
Driving around or even simply parking your vehicle with a non-covered broken window brings attention – a whole lot of attention you don’t want!
Although a car with a temporary cover wouldn’t be all that difficult to break into, it still provides a psychological feeling of privacy and protection. This is especially true if you install the cover professionally so that it doesn’t look like a cover unless people come up close to it and inspect it carefully.
Wrapping it Up
Dealing with a vehicle that has a broken window is a stressful experience on its own. Luckily, covering it until a permanent fix can be set up should be an easy process.
If you have the time to run to your auto body shop, the crash wrap solution is the safest and most convenient option.
If you need an immediate solution and have clear duct tape at home, you shouldn’t need anything else.
Covering the opening with a plastic bag is the least desirable solution, and should only be used if you’re not planning to drive your car before you can get a permanent fix.


